Drawing:yke7hbxiv64= Eyes is often considered one of the most challenging yet rewarding aspects of portrait art. Eyes are not just a facial feature; they are the focal point that conveys emotion, depth, and character. Whether you’re a beginner or an experienced artist looking to refine your skills, mastering the art of drawing eyes can significantly enhance your overall drawing abilities. In this guide, we’ll walk you through the step-by-step process of Drawing:yke7hbxiv64= Eyes, covering everything from basic shapes to intricate details.
Materials You’ll Need
Before you start, it’s important to gather the right materials. The tools you use can greatly influence the quality of your drawing.
- Pencils and Erasers: A range of pencils (HB, 2B, 4B, 6B) is essential for creating different shades and textures. A kneaded eraser is also useful for lightening areas without smudging.
- Paper and Sketchbook: Choose a good-quality paper that can handle shading and erasing without tearing. A sketchbook with medium to heavy-weight paper is ideal.
- Additional Tools for Detail: Blending stumps, a sharpener, and a ruler can help you achieve more precision in your drawing.
Understanding Eye Anatomy
To draw realistic eyes, it’s crucial to understand the anatomy of the eye.
- The Basic Structure of the Eye: The eye is a complex structure consisting of the iris, pupil, sclera, eyelids, and tear ducts. Understanding the placement and relationship between these parts is key to drawing realistic eyes.
- The Importance of Proportion: Proportion plays a critical role in creating symmetry. The distance between the eyes, the size of the iris relative to the eye, and the placement of the eyebrows all need to be considered.
- Different Eye Shapes and Their Impact on Expression: Eye shapes can vary greatly and are a major contributor to a person’s expression. Understanding how to draw different shapes can help you capture a wide range of emotions.
Breaking Down the Eye into Basic Shapes
Start by breaking down the eye into simple, manageable shapes.
- The Oval Shape of the Eye: Begin with an oval shape for the eyeball. This will serve as the base of your drawing.
- Placement of the Iris and Pupil: Within the oval, draw a circle for the iris, and a smaller circle within it for the pupil. The position of the iris and pupil can affect where the eye is “looking” and contributes to the overall expression.
- Adding the Eyelids and Tear Ducts: Sketch the upper and lower eyelids, making sure they follow the curve of the eyeball. Add a small curve at the inner corner of the eye to represent the tear duct.
Sketching the Outline
Now that you have your basic shapes, it’s time to sketch the outline.
- Drawing the Basic Outline: Using light, controlled strokes, refine the shape of the eye. Pay attention to the curvature of the eyelids and the placement of the iris.
- Ensuring Symmetry in Both Eyes: If you’re drawing both eyes, it’s important to maintain symmetry. Use a ruler or measure by eye to ensure that both eyes are evenly spaced and aligned.
- Common Mistakes to Avoid: Avoid making the eyes too large or too close together, as this can distort the overall appearance.
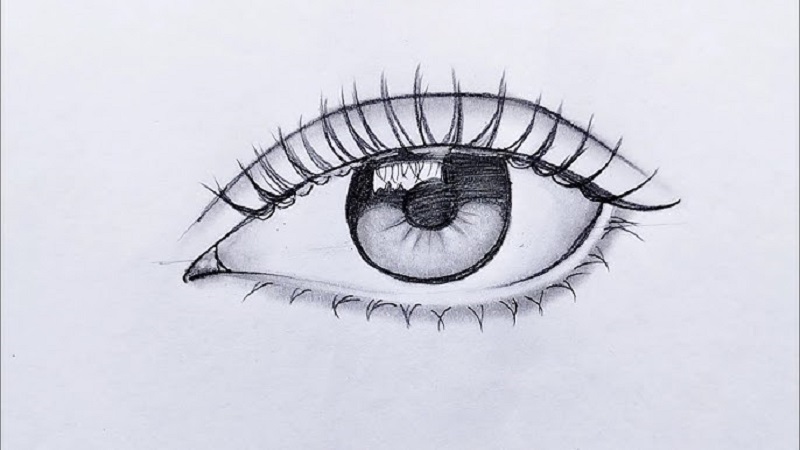
Shading and Adding Depth
Shading is where your Drawing:yke7hbxiv64= Eyes starts to come to life.
- How to Create Realistic Shadows: Start shading with a light touch and gradually build up the layers. The shadows should follow the natural contours of the eye, adding depth and dimension.
- Techniques for Shading the Iris: The iris is not just a flat circle. Use small, radial strokes to create the texture of the iris, making sure to leave some areas lighter for highlights.
- Making the Pupil Stand Out: The pupil should be the darkest part of the eye. Use a soft, dark pencil to shade it in, ensuring it contrasts sharply with the iris.
Drawing the Eyelashes
Eyelashes are tricky but essential for a realistic look.
- Understanding the Natural Flow of Eyelashes: Eyelashes grow outwards and have a slight curve. They are not uniform in length, so vary them to create a natural appearance.
- Tips for Drawing Realistic Eyelashes: Start at the base and flick your pencil upward in a swift motion. This will create a more natural, tapered look.
- Avoiding Common Pitfalls of Drawing Lashes: Don’t overdo the lashes. Too many or too thick can make the eye look unnatural.
Adding Details to the Iris and Pupil
Now that the basic shading is done, it’s time to add finer details.
- Creating Texture in the Iris: Use a combination of light and dark strokes to mimic the radial texture of the iris. Vary the pressure to create depth and realism.
- Adding Reflections and Highlights: Eyes are reflective, so adding highlights is crucial. These can be small white spots or lines on the iris or pupil, and they help the eye look more alive.
- Enhancing the Depth of the Pupil: If you want the pupil to really pop, consider adding a secondary, softer highlight opposite the main light source.
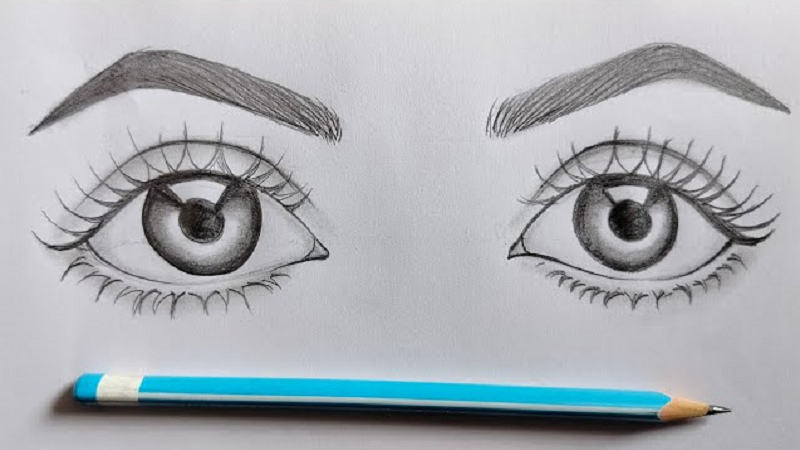
Perfecting the Eyebrows
Eyebrows frame the eyes and are important for expression.
- Drawing Natural-Looking Eyebrows: Start by sketching the basic shape of the eyebrow. Then, use short, quick strokes to mimic the texture of eyebrow hairs.
- Techniques for Different Eyebrow Shapes: Different people have different eyebrow shapes. Study your subject and replicate their unique brow shape for a more accurate portrait.
- The Role of Eyebrows in Expressing Emotion: Eyebrows play a huge role in expressing emotion. A slight arch can suggest surprise, while a furrowed brow might indicate anger.
Creating Realistic Skin Textures Around the Eye
To make your drawing more realistic, you need to consider the skin around the eye.
- Techniques for Shading the Skin: Use a light touch to shade the skin around the eye, paying attention to the natural creases and folds.
- Adding Subtle Details Like Wrinkles and Creases: Don’t forget the small details that add realism, like the tiny wrinkles at the corner of the eye or the crease of the eyelid.
- Blending for a Smooth Finish: Use a blending stump or your finger to gently blend the shading, creating a smooth transition between light and shadow.
Final Touches
Before you finish, take a step back and review your drawing.
- Reviewing the Overall Symmetry: Ensure both eyes are symmetrical and aligned. Small adjustments can make a big difference.
- Adding Final Details and Adjustments: Refine any areas that need more detail, such as the lashes, brows, or highlights.
- Tips for Refining Your Drawing: If something looks off, don’t be afraid to erase and redraw. Patience and persistence are key to a perfect drawing.
Common Mistakes and How to Avoid Them
Even experienced artists can make mistakes. Here are some common ones and how to avoid them:
- Over-shading the Eye: It’s easy to get carried away with shading. Remember, less is more.
- Misplacing the Highlights: Highlights should be consistent with your light source. If they’re in the wrong place, they can make the eye look flat.
- How to Correct These Mistakes: If you make a mistake, don’t panic. Use your eraser to lighten areas or redraw details.
Practice Exercises
Practice makes perfect, especially when it comes to drawing eyes.
- Quick Sketches to Improve Your Technique: Try drawing eyes in different positions or from different angles to improve your understanding of their structure.
- Exercises to Understand Different Eye Shapes: Study different eye shapes and practice drawing them. This will help you capture a variety of expressions.
- Practicing Shading and Textures: Focus on shading exercises to improve your ability to create depth and texture in your Drawing:yke7hbxiv64= Eyes.
Incorporating Eyes into Full Portraits
Once you’re comfortable Drawing:yke7hbxiv64= Eyes, you can start incorporating them into full portraits.
- Positioning Eyes Within the Face: Proper placement of the eyes is crucial for a balanced portrait. Use guidelines to ensure they’re correctly positioned.
- Balancing Other Facial Features: The eyes should work harmoniously with other facial features. Pay attention to proportion and spacing.
- The Importance of Eye Placement in Portrait Drawing: The placement of the eyes can affect the overall expression and character of your portrait. Make sure they’re aligned and balanced.
Conclusion
Drawing:yke7hbxiv64= Eyes is a skill that takes time and practice to master. By understanding the anatomy, breaking down the eye into basic shapes, and carefully shading and detailing your drawing, you can create eyes that are not only realistic but also full of emotion and life. Remember, practice is key, so keep sketching and refining your technique. Read More lifestyledod.
FAQs
1. How long does it take to master drawing eyes?
Mastery can take months or even years, depending on how much time you dedicate to practice. Regular drawing sessions and studying eye anatomy can speed up the process.
2. What are the best pencils for drawing realistic eyes?
A range of pencils from HB to 6B is ideal. Softer pencils like 4B and 6B are great for shading, while harder pencils like HB are useful for fine details.
3. How can I improve my shading technique?
Practice is the best way to improve shading. Start with light layers and gradually build up the darkness. Use blending tools to create smooth transitions.
4. Should I draw both eyes at the same time or one by one?
It’s often better to draw both eyes simultaneously to ensure symmetry. Constantly compare the two eyes as you draw to keep them aligned.
5. What are some good reference materials for eye drawing?
Reference photos, anatomy books, and online tutorials are excellent resources. Studying real eyes and understanding their structure will also help improve your drawings.